Update #1: there has been another update
New MinimalComp: WheelNav, but I’m pretty sure I won’t been using this one very much…
I’m using this for some time now, and it’s time to share this with you all: Minimalcomps from BIT-101.
This lite-weight components set is great, I can see what the code is doing, it’s easy to use and its simplicity is beautiful (and I love pixel font in Flash, I should use it more).
Minimal ActionScript 3.0 code only UI components
Do you need some reading material? Some documentation and introduction can be found on Keith Peters (BIT-101) site: read the first post about the Minimalcomps.
But in short:
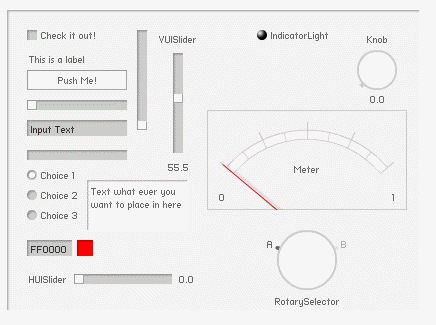
This are some of the examples (since the first post there are some new components created, but they are not as frequently used as this set);
[swf]http://www.bit-101.com/minimalcomps/ComponentPlayground.swf, 500, 500[/swf]
For lazy readers (and a reminder for myself: the site of BIT-101 doesn’t have a very useful search, and the google code page doesn’t have documentation), here some code to create what you see above not entirely true, but I will keep the code here:
[as collapse=”true”]
var panel:Panel = new Panel(this, stage.stageWidth / 4, stage.stageHeight / 8);
panel.setSize(stage.stageWidth / 2, stage.stageHeight * 3 / 4);
var checkBox:CheckBox = new CheckBox(panel, 20, 20);
checkBox.label = "Check it out!";
var label:Label = new Label(panel, 20, 40);
label.text = "This is a label";
var pushbutton:PushButton = new PushButton(panel, 20, 60);
pushbutton.label = "Push Me!";
pushbutton.width = 100;
var hSlider:HSlider = new HSlider(panel, 20, 90);
var vSlider:VSlider = new VSlider(panel, 130, 20);
var inputText:InputText = new InputText(panel, 20, 110);
inputText.text = "Input Text";
var _progressBar:ProgressBar = new ProgressBar(panel, 20, 140);
var radio1:RadioButton = new RadioButton(panel, 20, 160);
radio1.label = "Choice 1";
var radio2:RadioButton = new RadioButton(panel, 20, 180);
radio2.label = "Choice 2";
var radio3:RadioButton = new RadioButton(panel, 20, 200);
radio3.label = "Choice 3";
var colorchooser:ColorChooser = new ColorChooser(panel, 20, 230);
colorchooser.value = 0xff0000;
[/as]
This is the code you want to use, to create all the components (minus wheelnav… ) in a document class.

[as]
package
{
import com.bit101.components.*;
import flash.display.*;
import flash.events.*;
/**
* @author Matthijs Kamstra aka [mck]
*/
public class MainCube extends MovieClip
{
public function MainCube():void
{
trace( "MainCube.MainCube" );
var panel:Panel = new Panel(this, 20, 20);
panel.setSize(stage.stageWidth * .75, stage.stageHeight * .75);
var _CheckBox:CheckBox = new CheckBox(panel, 20, 20, "Check it out!");
var _Label:Label = new Label(panel, 20, 40, "This is a label");
var _PushButton:PushButton = new PushButton(panel, 20, 60, "Push Me!");
_PushButton.width = 100;
var _HSlider:HSlider = new HSlider(panel, 20, 90);
var _VSlider:VSlider = new VSlider(panel, 130, 20);
var _VUISlider:VUISlider = new VUISlider(panel, 150, 20, ‘VUISlider’);
_VUISlider.value = 55.5;
var _HUISlider:HUISlider = new HUISlider (panel, 20, 260, ‘HUISlider’);
var _InputText:InputText = new InputText(panel, 20, 110, "Input Text");
var _ProgressBar:ProgressBar = new ProgressBar(panel, 20, 140);
//trace( "_ProgressBar.maximum : " + _ProgressBar.maximum );
_ProgressBar.value = .75;
var radio1:RadioButton = new RadioButton(panel, 20, 160, "Choice 1", true);
var radio2:RadioButton = new RadioButton(panel, 20, 180, "Choice 2");
var radio3:RadioButton = new RadioButton(panel, 20, 200, "Choice 3");
var _ColorChooser:ColorChooser = new ColorChooser(panel, 20, 230, 0xff0000);
var _IndicatorLight:IndicatorLight = new IndicatorLight (panel, 250, 20, 0xff00ff, "IndicatorLight");
var _Knob:Knob = new Knob (panel, 350, 20, "Knob");
var _Meter:Meter = new Meter (panel, 200, 100, "Meter");
var _RotarySelector:RotarySelector = new RotarySelector (panel, 270, 220, "RotarySelector");
var _Text:Text = new Text (panel, 80, 170, "Text what ever you want to place in here");
_Text.setSize (100, 50);
}
} // end class
} // end package
[/as]
And it quite easy to create buttons:
[as]
var myButton:PushButton = new PushButton(this, 10, 20, onClick);
function onClick (e:Event){
trace (‘onClick’);
// do something else
}
[/as]
You can download the MinimalComps set at: http://code.google.com/p/minimalcomps/
The set includes a CheckBox, PushButton, HSlider, VSlider, InputText, ProgressBar, RadioButton, ColorChooser (text input only) and Panel.
One big fat tip from me:
in the zip you will find a folder named ‘assets’ and in there is a truetype font called ‘
pf_ronda_seven.ttf‘. You need to install that on your computer (Windows: C:\WINDOWS\Fonts , Apple: ??)
and add it to your Flash file.
How to add a font to the Flash Library
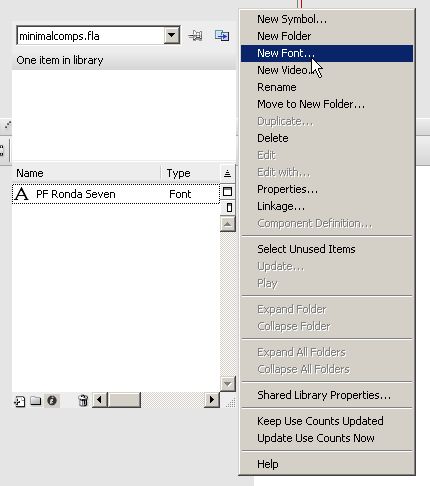
Goto your library, add a “New Font”

(sorry for the strange looking Flash, it has something to do with my screenshot programm)
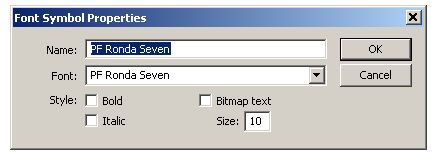
Name: “PF Ronda Seven” (you need to spell this exactly as here, without the quotes (“))
Font: search for “PF Ronda Seven”, if you can’t find it, you probably need to restart Flash.
Size: 10

(use this screenshot as an example if you don’t know what I mean)
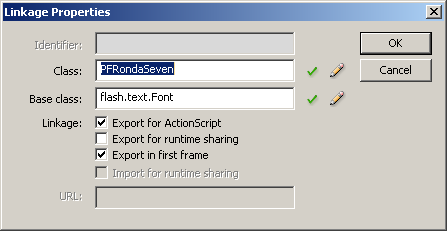
You need to embed the font from the library into the .FLA : search the font you just created in the library and Right Click >> choose Linkage. Just check “Export for Actionscript” (“Export in first frame” will be activated to). I didn’t change anything, press “OK”

and you done!


