I love to create projects where you take stuff from the digital world (temporarily, intangible) and drag it into the “real” world. This project is a good example of that. I create a papertoy generated in code and cut by a machine.
Besides filling my blog with new content, I have two other reasons to write this post:
- You can use Haxe/Openfl for something else then game-developement! I know I am not the only one, but this group of developers are not as present as the game-defs.
- It’s a long and complicated process to get to the end result: it’s difficult to explain this in detail to others, so I wrote down the whole story for interested friend/family/colleagues/fans???
If I ever grow a pair, this post be one of the two talks I would give during wwx2015 just to balance the all tech talks during the event.
But nothing is growing besides my hair, so instead I will write about the process and end-result.
Feedback is always nice, so please don’t hesitate to comment!
Intro
I always say I have two jobs: during the day I am a developer (AS3, javascript, Haxe, Openfl, lately some Java) at Fonk but at night I change into an awesome papertoy engineer (superhero 😛 ).
The papertoy stuff I do at night, is extremely fun hobby: beside that people download and build my designs I am also featured in some books:
- Urban-Paper-Designer-Toys
- Papertoy-Monsters
- Paper-Robots
- And there is another book coming out … soonish
And this post is about both of them; I managed to fuse them together in a Code generated papertoys!
Where did the idea start?

I while back I got a Cricut Explore from the Cricut company to try out. It’s a nice machine which is extremely good in cutting. Just for the readers that never have build a papertoy, the cutting is the part that you really want to skip… especially if the model is complex. That’s why papertoys are very simple shaped and usually on one page: it’s easy to cut, easy to understand and doable in one hour.
So what makes the Cricut useful? The cutting! So here the idea started to make a papertoy that is complex to cut.
What’s the “brief”?
It’s always a good idea to set some limits in a project, so here are the ones I worked with.
There is a papersize limit that the Cricut can do: it’s around a A3. Yes, vague, I know, but remember the machine isn’t on sale in Europe yet so it’s not on “our” paper-size-system yet.
But eventually I decide to use A4 size paper.
Reason for this:
- A4 will take less time to print
- the bigger the papertoy, the heavier the paper needs to be to support itself
- less intimidating to build
So just one piece of paper, in this case A4 (or letter). It should be easy to build, so not a lots of parts to assemble.
Very quick result during building.
But what I really want: an Art installation: big red button, press it and …
Generate a papertoy, machine cut and presto: an uniquely generated papertoy to build.
Design a papertoy that can be cut by machine
First a papertoy design that is easy to build and fits on one piece of paper:
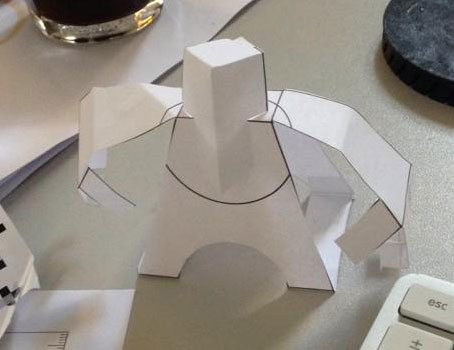
I decide to call it Pixlrr!
Randomize the papertoy shape
Some ideas just linger in the back of my mind, waiting for a little push/help in the right direction.
Same with this project, I had some ideas how to randomize the shape of the papertoy but all of them didn’t “fit”.
Till I red about an awesome project by Dave Bollinger: pixelspaceshipsAnd it was exactly what I needed!
So to experiment with the idea I build a pixel-sprite-generator-editor, so it was easier to change the design and see the outcome.
Btw the pixel-sprite-generator-editor is opensource at Github.
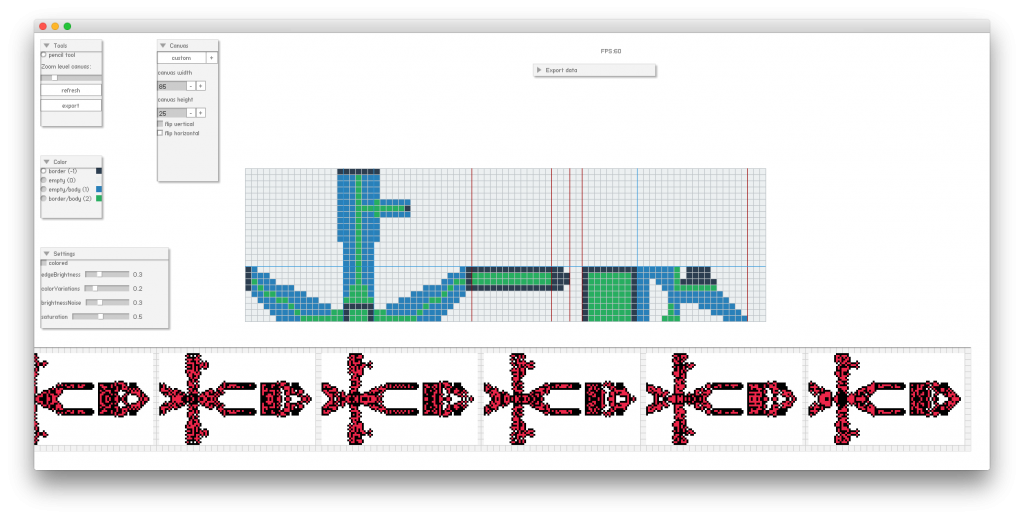
The pixel-sprite-pattern in which I eventually generated the papertoy is:
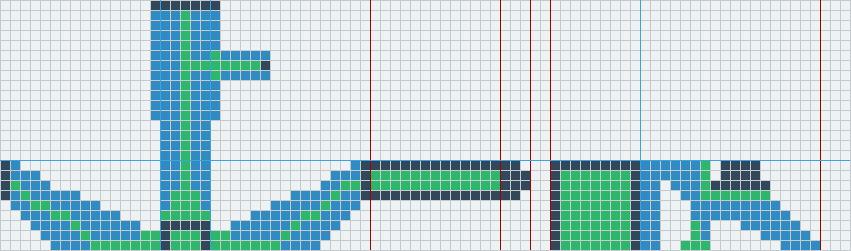
Quick reminder: dark-blue is a border, blue is empty/body and green is body/border. The pattern is mirrored, which creates a nice symmetry.
This is the output (100%) if you export to Neko, yes… small… because it’s done in pixels 😀

Okay, a little bigger:
The left part is the body of the papertoy and the right is the mask/face.
Vectorize the pixel image
Pixels are fine if you only have to print the image. I haven’t tried it, but I am not sure it will print the pixels sharp.
I not only want to print it (and keep the image sharp) but I need to feed it to the Cricut Explorer. And it needs vectors to calculate a cutting path.
How to convert this pixel image into something that is scalable?
Funny how some ideas help other ideas: I while back I started (and quickly ended again… 😀 ) a blog (blog-engine CyberMonk is also written by me) with patterns I created … with code and exported to .svg.
Currently Scalable Vector Graphics (.svg) are very common for web-development and it’s nice format because it looks like xml.
So I already had a way to create .svg with code!
The rest is not that difficult, eventually you need a bitmap, but from there it’s straight forward:
for (y in 0..._height) {
	for (x in 0..._width) {
		var color : Int = _bitmap.bitmapData.getPixel(x, y);
		// trace ("color: " + StringTools.hex(color,6));
		_colorArray.push  (color);
	}
}
Check: getPixel openfl documentation
Once you have indexed all pixel-colors you generate the svg with a lot of rectangles.
I do some clever things like grouping them, but it’s really is just a lot of rectangles:
<rect id="rectangle_63866_1_" x="160" y="10" fill="#ED264A" width="10" height="10"/>
Let’s be honest
The generation of the papertoys are not entirely automated.
I generate lines for folding and cutting. But I couldn’t get the code to work for the biggest outline used for cutting (all the red en black pixels together). I got it working for simple shapes, but somewhere in my code I end op in a infinity loop. I probably will fix this later (or not).
But to speed up the process, I just united this black/red-“pixels” in Illustrator.
Other part that could be better, but I have little controle over. You need to upload the svg into the editor of Cricut (online). There you need to add it to the canvas, change some of the layers to folding/scorning, “fix” the image (lets say it’s just one click extra you need to do), save the project online and send the data to the machine.
All this means that if I want 100 unique Pixlrr papertoys, I need to have 100 projects online with the changes I just described… It really is not unique, although I can generate the papertoy very easily and in great numbers.
Printing the pattern on the paper (and cutting it) is not impossible, but very labor-intensive. I haven’t even tried it.
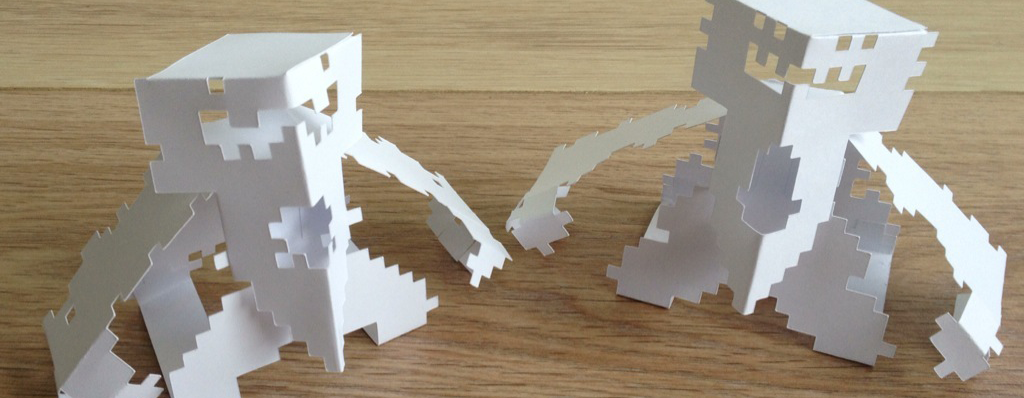
Final

I am very happy with the end-result. Even when you cut Pixlrr out on plain white paper they look great.
The process of getting to this papertoy was fun. It created 3 new projects on my computer 😀 .
Problems! / Solutions?
Okay I know problems are just just problems till they get solved. But these are the ones I ran into.
- Printing and Cutting are on two different machines
- Folding/scorning of the Cricut is not precise (or deep) enough for my papertoy
- Cricut Explorer works only in the cloud
- I need to hack the Cricut machine to get access to it by code to really create unique papertoys
- The paper need to placed on a sticky cutting mat
- Outline the big shape in code
- …
Here my ideas to fix these:
- Colored paper works, but I think I will cut up some old comics to make it even more awesome!
- I will create a dotted line where I want to fold and cut that way a fold
- Bummer, can’t change that unless I change
- I have looked into that, but don’t think I want to go that way
- Perhaps a laser cutter … but for now not a solution
- on my todo list
- …