Categories
Extending Flash Flash

Object 2 Layer jsfl

For a project of mine: Custmm Grumm I needed to change a shape into an array (explained in this post shape 2 array jsfl ).

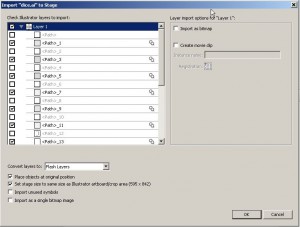
To make this happen I imported the .AI file (Illustrator) to the stage. But it will place everything on one layer, every shape it’s own ‘group’ and the script I wrote (shape 2 array jsfl), needs every shape on one layer.
Flash import screen

So here a script that, as long the different shape are still group individually, will give every shape it’s own layer.

Update #1: This script is not only useful in this project, in every project where you have a lot of objects that need there own layer, this is the JSFL for you!
Remember if you need to animate an movieclip, it needs to have it’s own layer (timeline)

Need a lot of item on there own layer (own timeline) in Flash, don’t copy past it one by one, but just use this JSFL

Not sure how to call this script when you save it: “[mck] object2layer.jsfl
[as]
/**
* Object2Layer, version 1.1
*
* select an item on the timeline and convert it to a layer
*
*

*  ____                   _      ____
* |  __| _ __ ___    ___ | | __ |__  |
* | |   | '_ ` _ \  / __|| |/ /    | |
* | |   | | | | | || (__ |   <     | |
* | |__ |_| |_| |_| \___||_|\_\  __| |
* |____|                        |____|
*
* 

*
* @author Matthijs C. Kamstra [mck]
* @version 1.1
* @since Fri Jun 01 19:43:37 2007
* @langversion: ActionScript 2.0 / 3.0
*
* Changelog:
* v 1.0 [2007-06-01] - Initial release
* v 1.1 [2008-03-20] - Change jsfl name; multiple item at once
*/

var versionString = '1.1';

var currentDoc = fl.getDocumentDOM ();
var timeline = fl.getDocumentDOM ().getTimeline ();
var curLayer = fl.getDocumentDOM ().getTimeline ().currentLayer;
var curFrame = fl.getDocumentDOM ().getTimeline ().currentFrame;
var selectionArray = currentDoc.selection;

// check if something is selected
if (selectionArray.length == 0){
alert ('nothing selected')
} else {
fl.getDocumentDOM().distributeToLayers();
}
// end
[/as]

have fun 🙂

Categories
AS3 AS3 migration Flash

From AS2 to AS3 – Where did it go – attachMovie

Where did attachMovie go in AS3?

Once I started using attachMovie instead duplicateMovieClip my AS2 life became a lot easier.

What has the ActionScript 2.0 Migration to say about this subject:

ActionScript 2.0  ActionScript 3.0  Comments
attachMovie() Method Removed In ActionScript 3.0, use addChild() to add child display objects.

Removed… wtf? and you can read the documentation till you are old and gray, but you won’t find a answer there.

In AS2 I know 3 ways to attach a movie to the stage:

Categories
AS3 AS3 migration Flash Open source / Freeware

From AS2 to AS3 – Where did it go – setRGB

Update #1: It seems that .setRGB () has been deprecated in favor of the flash.geom.ColorTransform class. So a little as2 update.

In some cases I can’t help thinking that AS3 hasn’t made our live easier.
The same happened with the change that happened from the AS2 setRGB to AS3.

Specifies an RGB color for a Color object.

setRGB

This is what the ActionScript 2.0 Migration has to say about this:

ActionScript 2.0 ActionScript 3.0 Comments
setRGB() Method flash.geom.ColorTransform.color The RGB color value can be set by using the color accessor property of the ColorTransform class.

ActionScript 2 example code:
[as]
// AS2 Code
var my_color:Color = new Color(my_mc);
my_color.setRGB(0xFF0000); // my_mc turns red
[/as]

Another AS2 example because: “The Color class has been deprecated in favor of the flash.geom.ColorTransform class.”
[as]
// AS2 Code (The Color class has been deprecated in favor of the flash.geom.ColorTransform class.)
import flash.geom.ColorTransform;

var colorTrans:ColorTransform = new ColorTransform();
colorTrans.rgb = 0xFF0000;
var trans:Transform = new Transform( my_mc);
trans.colorTransform = colorTrans;[/as]

and the same code in ActionScript 3:
[as]
// AS3 code
import flash.geom.ColorTransform;

// Changes my_mc’s color to red.
var newColorTransform:ColorTransform = my_mc.transform.colorTransform;
newColorTransform.color = 0xff0000;
my_mc.transform.colorTransform = newColorTransform;
[/as]

More code to write, for something that I don’t use very much. The next time I need to change an Objects color I probably need to search the solution on the web…

No, I going to fix this in a neat little package:
Save this file into: ‘nl.matthijskamstra.utils’
[as]
/**
* Color (AS3), version 1.0
*
* Enter description here
*
*

*  ____                   _      ____ 
* |  __| _ __ ___    ___ | | __ |__  |
* | |   | '_ ` _ \  / __|| |/ /    | |
* | |   | | | | | || (__ |   <     | |
* | |__ |_| |_| |_| \___||_|\_\  __| |
* |____|                        |____|
* 
* 

*
* @class : Color
* @author : Matthijs C. Kamstra [mck]
* @version : 1.0 - class creation (AS3)
* @since : 11-5-2008 0:22
*
*/
package nl.matthijskamstra.utils {

import flash.display.*;
import flash.events.*;
import flash.geom.ColorTransform;

public class Color {

// Constants:
public static var CLASS_REF = nl.matthijskamstra.utils.Color;
public static var CLASS_NAME : String = "Color";
public static var LINKAGE_ID : String = "nl.matthijskamstra.utils.Color";

/**
* Constructor
*
* @usage import nl.matthijskamstra.utils.Color; // import
* var __Color:Color = new Color ( this );
* @param $targetObj a reference to a movie clip or object
*/
public function Color( $targetObj:DisplayObject=null, $colorValue:uint = 0xff3333) {
// trace ( LINKAGE_ID + ' class instantiated');
if ($targetObj == null) { return; }
var newColorTransform:ColorTransform = $targetObj.transform.colorTransform;
newColorTransform.color = $colorValue;
$targetObj.transform.colorTransform = newColorTransform;
}

//////////////////////////////////////// Static ///////////////////////////////////////

static public function setRGB( $targetObj:DisplayObject = null, $colorValue:uint = 0xff3333) {
return new Color ( $targetObj, $colorValue);
}

} // end class

} // end package
[/as]

And now I hope you will never have to look for it again
Happy AS3 😉

Categories
AS3 Flash Open source / Freeware

Lite components from BIT-101: Minimalcomps

Update #1: there has been another update New MinimalComp: WheelNav, but I’m pretty sure I won’t been using this one very much…

I’m using this for some time now, and it’s time to share this with you all: Minimalcomps from BIT-101.

This lite-weight components set is great, I can see what the code is doing, it’s easy to use and its simplicity is beautiful (and I love pixel font in Flash, I should use it more).

Minimal ActionScript 3.0 code only UI components

Do you need some reading material? Some documentation and introduction can be found on Keith Peters (BIT-101) site: read the first post about the Minimalcomps.

But in short:
This are some of the examples (since the first post there are some new components created, but they are not as frequently used as this set);

[swf]http://www.bit-101.com/minimalcomps/ComponentPlayground.swf, 500, 500[/swf]

For lazy readers (and a reminder for myself: the site of BIT-101 doesn’t have a very useful search, and the google code page doesn’t have documentation), here some code to create what you see above not entirely true, but I will keep the code here:
[as collapse=”true”]
var panel:Panel = new Panel(this, stage.stageWidth / 4, stage.stageHeight / 8);
panel.setSize(stage.stageWidth / 2, stage.stageHeight * 3 / 4);

var checkBox:CheckBox = new CheckBox(panel, 20, 20);
checkBox.label = &quot;Check it out!&quot;;

var label:Label = new Label(panel, 20, 40);
label.text = &quot;This is a label&quot;;

var pushbutton:PushButton = new PushButton(panel, 20, 60);
pushbutton.label = &quot;Push Me!&quot;;
pushbutton.width = 100;

var hSlider:HSlider = new HSlider(panel, 20, 90);
var vSlider:VSlider = new VSlider(panel, 130, 20);

var inputText:InputText = new InputText(panel, 20, 110);
inputText.text = &quot;Input Text&quot;;

var _progressBar:ProgressBar = new ProgressBar(panel, 20, 140);

var radio1:RadioButton = new RadioButton(panel, 20, 160);
radio1.label = &quot;Choice 1&quot;;
var radio2:RadioButton = new RadioButton(panel, 20, 180);
radio2.label = &quot;Choice 2&quot;;
var radio3:RadioButton = new RadioButton(panel, 20, 200);
radio3.label = &quot;Choice 3&quot;;

var colorchooser:ColorChooser = new ColorChooser(panel, 20, 230);
colorchooser.value = 0xff0000;
[/as]

This is the code you want to use, to create all the components (minus wheelnav… ) in a document class.
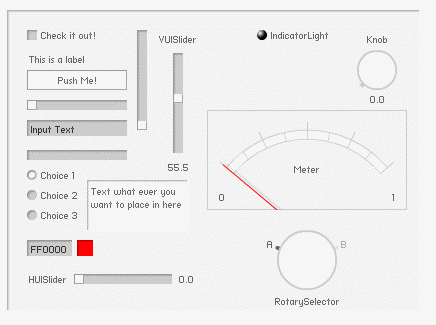
MinimalComps collection
[as]
package
{
import com.bit101.components.*;
import flash.display.*;
import flash.events.*;

/**
* @author Matthijs Kamstra aka [mck]
*/
public class MainCube extends MovieClip
{

public function MainCube():void
{
trace( &quot;MainCube.MainCube&quot; );

var panel:Panel = new Panel(this, 20, 20);
panel.setSize(stage.stageWidth * .75, stage.stageHeight * .75);

var _CheckBox:CheckBox = new CheckBox(panel, 20, 20, &quot;Check it out!&quot;);

var _Label:Label = new Label(panel, 20, 40, &quot;This is a label&quot;);

var _PushButton:PushButton = new PushButton(panel, 20, 60, &quot;Push Me!&quot;);
_PushButton.width = 100;

var _HSlider:HSlider = new HSlider(panel, 20, 90);
var _VSlider:VSlider = new VSlider(panel, 130, 20);

var _VUISlider:VUISlider = new VUISlider(panel, 150, 20, ‘VUISlider’);
_VUISlider.value = 55.5;
var _HUISlider:HUISlider = new HUISlider (panel, 20, 260, ‘HUISlider’);

var _InputText:InputText = new InputText(panel, 20, 110, &quot;Input Text&quot;);

var _ProgressBar:ProgressBar = new ProgressBar(panel, 20, 140);
//trace( &quot;_ProgressBar.maximum : &quot; + _ProgressBar.maximum );
_ProgressBar.value = .75;

var radio1:RadioButton = new RadioButton(panel, 20, 160, &quot;Choice 1&quot;, true);
var radio2:RadioButton = new RadioButton(panel, 20, 180, &quot;Choice 2&quot;);
var radio3:RadioButton = new RadioButton(panel, 20, 200, &quot;Choice 3&quot;);

var _ColorChooser:ColorChooser = new ColorChooser(panel, 20, 230, 0xff0000);

var _IndicatorLight:IndicatorLight = new IndicatorLight (panel, 250, 20, 0xff00ff, &quot;IndicatorLight&quot;);

var _Knob:Knob = new Knob (panel, 350, 20, &quot;Knob&quot;);

var _Meter:Meter = new Meter (panel, 200, 100, &quot;Meter&quot;);

var _RotarySelector:RotarySelector = new RotarySelector (panel, 270, 220, &quot;RotarySelector&quot;);

var _Text:Text = new Text (panel, 80, 170, &quot;Text what ever you want to place in here&quot;);
_Text.setSize (100, 50);

}

} // end class

} // end package
[/as]

And it quite easy to create buttons:
[as]
var myButton:PushButton = new PushButton(this, 10, 20, onClick);
function onClick (e:Event){
trace (‘onClick’);
// do something else
}
[/as]

You can download the MinimalComps set at: http://code.google.com/p/minimalcomps/
The set includes a CheckBox, PushButton, HSlider, VSlider, InputText, ProgressBar, RadioButton, ColorChooser (text input only) and Panel.

One big fat tip from me:
in the zip you will find a folder named ‘assets’ and in there is a truetype font called ‘pf_ronda_seven.ttf‘. You need to install that on your computer (Windows: C:\WINDOWS\Fonts , Apple: ??) and add it to your Flash file.

How to add a font to the Flash Library

Goto your library, add a “New Font”
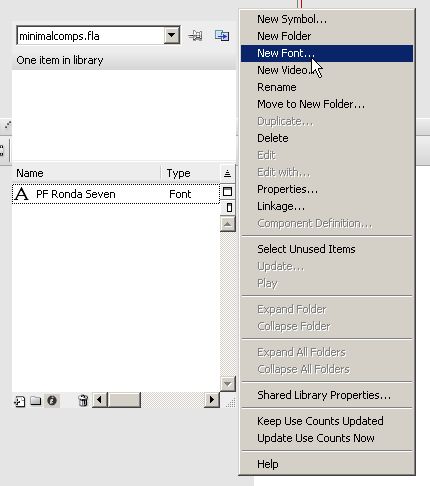
Library add New Font
(sorry for the strange looking Flash, it has something to do with my screenshot programm)

Name: “PF Ronda Seven” (you need to spell this exactly as here, without the quotes (“))
Font: search for “PF Ronda Seven”, if you can’t find it, you probably need to restart Flash.
Size: 10
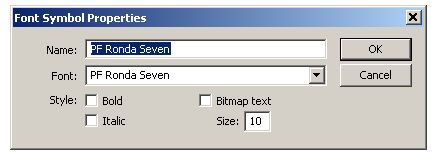
Font Symbol screen
(use this screenshot as an example if you don’t know what I mean)

You need to embed the font from the library into the .FLA : search the font you just created in the library and Right Click >> choose Linkage. Just check “Export for Actionscript” (“Export in first frame” will be activated to). I didn’t change anything, press “OK”
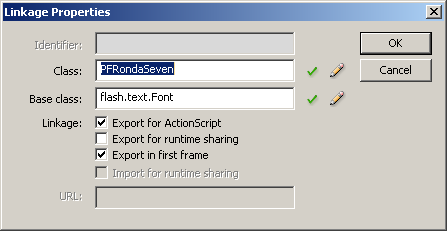
and you done!
Categories
Flash WordPress Plugin

ActionScript syntax highlighting

I wanted an easy way to present my ActionScript code on my blog.

The easiest way is to use the code button in WordPress and CSS.
I’ve used this in combination with the pre tag
But that’s doesn’t show nice code highlighting or line numbers…

Syntax highlighting is a feature of some text editors that displays text “especially source code” in different colors and fonts according to the category of terms.

I found out that there are two (probably more, but these two are the ones I tested) methods:
code highlighting server sided (PHP) or client sided (javascript)

Server sided

The first WordPress highlight plugin is: iG:Syntax Hiliter which is based upon GeSHi.

GeSHi – Generic Syntax Highlighter for PHP. Used to highlight almost any code for the web. Nearly 100 supported languages: PHP, HTML, C and more. Styles can be changed on the fly and CSS classes can be used to reduce the amount of XHTML compliant output.

Because the code highlighting is done on the server it’s really quick.
The install was very easy and it’s very easy to use: [as] place your code here [/as] (this is the code you use for ActionScript, read the manual included in the zip for other languages)

Pro: serversided so the code highlighting is done almost at once, a lot of programming languages that can be highlighted, easy to use in WordPress
Con: extra pressure on the server?, no copy to clipboard, not sure how up-to-date the plugin is (it works very good, but the last post about the plugin is from 2006, although the writer of the plugin replies to recent comments), I’m not very fond of the default CSS (but that can be modified). no button in the WordPress wysiwyg/html editor

Client sided

The second plugin is: syntaxhighlighter written by Erik Range, this plugin is based upon dp.SyntaxHighlighter from Alex Gorbatchev.

The plugin that I installed is removed, but there is a new one:http://wordpress.org/extend/plugins/syntaxhighlighter/. This one is in the WordPress plugin directory, so it’s easy to install. I haven’t tested this one

syntaxhighlighter

SyntaxHighlighter is here to help a developer/coder to post code snippets online with ease and have it look pretty. It’s 100% Java Script based and it doesn’t care what you have on your server.

Because the code highlighting is done client sided, you will see some ‘flickering’, and change of appearances of the code block.
Default the dp.SyntaxHighlighter doesn’t include ActionScript so I had to add that to it (digitalflipbook wrote the javascript file so I only had to add it), change the WordPress plugin (it didn’t have ActionScript either ), update the WordPress Plugin to version 1.5.1 of dp.SyntaxHighlighter and fix the copy to clipboard function….

Pro: no extra pressure on the server, copy to clipboard, it looks nicer, posible to add just one language instead of all,
Con: no default ActionScript, view code in popup, no button in the WordPress wysiwyg/html editor

My choice

Both have there strong points and there weaknesses, but I choose iG:Syntax Hiliter because of it has included ActionScript default, and the processing of the code highlighting is done on the server side.

Update #1: For some reason iG:Syntax Hiliter changes the < code>-tag to a highlighted code block with the programming language code (never heard of that programming language 😉 ) but more strangely: to something unreadable… I always test all the plugins I want to use on a WordPress blog installed on a usb-webserver and the plugin works fine there, probably the plugins I have installed on my ‘live’ blog don’t play nice with each other. I don’t have the time to find out who they are, so I used syntaxhighlighter.
There is no reason you shouldn’t use iG:Syntax Hiliter: it works fine with WordPress 2.5, it just doesn’t on my blog. 🙁

[as]
function test ():void {
trace (‘test’);
}
[/as]

Categories
AS3

AS2 to AS3: get all objects in a movieclip

Sometimes you want a list of everything inside a movieclip. For example: you want to know the instance names of every movie in the root.

ActionScript 2

A little trick that I used a lot in AS2 is:

for(var i in _root){
   trace('key: ' + i + ', value: ' + _root[i]);
}

or

for(var i in target_mc){
   trace('key: ' + i + ', value: ' + target_mc[i]);
}

to find out which movies are in target_mc

It was not only a trick to trace everything, I also used it to reset movieclips (place them outside the stage, or delete them) or quickly make buttons out of them:

for(var i in target_mc){
	target_mc[i].id = i;
	target_mc[i].onRelease = function (){
		trace ("id = " + this.id); // onRelease the id will be called (the name of the movie)
	};
}

ActionScript 3

But in AS3 this doesn’t work any more!
And I know: AS3 should make my life easier…. well if I see the solution to the problem created by AS3, I have to disagree!

for (var i:uint = 0; i < target_mc.numChildren; i++){
	trace ('\t|\t ' +i+'.\t name:' + target_mc.getChildAt(i).name + '\t type:' + typeof (target_mc.getChildAt(i))+ '\t' + target_mc.getChildAt(i));
}

In AS3 you first have to get the "number of children" (numChildren) in a DisplayObjectContainer, then you have to say which child you want (getChildAt(i))...
A good thing about AS3 is, you get everything in a movieClip, even shapes you made there without a instance name.

I'm glad that I work with FlashDevelop, which has snippets so I don't have to type this constantly!

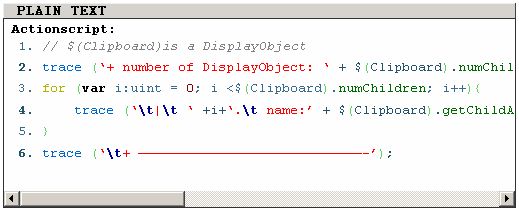
(For the people that use FlashDevelop too, here is my snippet:)

// $(Clipboard)is a DisplayObject
trace ('+ number of DisplayObject: ' + $(Clipboard).numChildren + '  --------------------------------');
for (var i:uint = 0; i < $(Clipboard).numChildren; i++){
	trace ('\t|\t ' +i+'.\t name:' + $(Clipboard).getChildAt(i).name + '\t type:' + typeof ($(Clipboard).getChildAt(i))+ '\t' + $(Clipboard).getChildAt(i));
}
trace ('\t+ --------------------------------------------------------------------------------------');
Categories
Flash Improvement Misc Urban papercraft

Separate RSS feeds Papercraft and Flash

Because I talk about two topics on my blog that have absolutely nothing to do with each other I created (well, WordPress provided it) two separate RSS feeds for Urban papercraft and Flash.

Custom RSS Links

Categories
AS3 AS3 migration Flash

From AS2 to AS3 – Where did it go – onRelease

Last year I started working with AS3, and after having some startup problems, I’ve made my first application in it (not online yet).
The strange thing is, I started a new project and when I had to make a button from a movieclip, I immediately wrote it in AS2… 🙁

That AS2 is embedded deep into my brain and probably more people have this problem.
So I started this series of post about the stuff that’s changed in from AS2 to AS3.

I will probably regurgitate what other people already wrote something about, but it’s my “travel” trough AS3 land.

onRelease

One of things I use in every application that I build is onRelease.

This is what the ActionScript 2.0 Migration has to say about this:

ActionScript 2.0 ActionScript 3.0 Comments
onRelease() EventHandler flash.display.InteractiveObject dispatches event: mouseUp Replaced in the new event model by a mouseUp event.

In AS2 I know 3 ways to use it:

Categories
AS3 Flash

AS3 – take one step at a time: step 1a

I’ve made a mistake, the code I original wrote doesn’t work (I’m glad nobody noticed it 😉 ). You can find the correct class here

My previous post is about my first step into ActionScript 3 (AS3) and in my case: trail and error is the best way to learn stuff.

But it takes some time to find out and sometimes it’s nice to have some help.

I found some help to fix this in the future : Patrick Mineault at 5 1/2 blog has created a AS2 to AS3 converter which you can test here and download here.

There is a web form to paste your code into and it will return your converted AS3 code (check it here).
There is also an command line exe in the zip file
I’m not very good at command line, so for your (and mine) convenience I will explain how to get the exe to work with a .BAT file (I work on a PC so the example only works on PC).

Download the zip file and extract it somewhere on your computer. In my case C:\tmp\convert
I’ve created to folders in the convert folder
C:\tmp\convert\input
C:\tmp\convert\output

and in the input folder I copied all the classes I’ve ever written.

Now create a file with a .BAT extension (in my case convert.bat) and it doesn’t matter where you put it, but I put it next to the convertas2as3.exe in C:\tmp\convert folder.

Open the file you just created and paste this in there:

pause
C:\tmp\convert\convertas2as3.exe -input "C:\tmp\convert\input" -output "C:\tmp\convert\output"

or adjust the path to the files you want to convert
save the file and open the .BAT file (in my case convert.bat) and all your classes you ever have written are converted to AS3…

Well as good as it get’s: it’s not 100 percent converted to AS3 but it helps you with most of your code, and helps you on your way to find the correct code.

example
take the code I translated in the previous post but now in a class file:

class nl.matthijskamstra.config.ConfigFile
{
	/**
	* Constructor 
	* To access and manipulate information about the boundaries of a SWF file.
	*/
	public function ConfigFile ()
	{
		// trace ("set flash to 'browser'-mode");
		_root._quality = "BEST";
		Stage.scaleMode = "noScale";
		Stage.showMenu = false;
		Stage.align = "TL";
	}
	/**
	* static function config.... same as above
	*
	* @usage   nl.matthijskamstra.config.ConfigFile.config ();
	*/
	static function config () : Void
	{
		var temp = new nl.matthijskamstra.config.ConfigFile ();
	}
}

and put it through the AS2 to AS3 online converter will become:

package  { 
class nl.matthijskamstra.config.ConfigFile
	import flash.ui.ContextMenu;
	import flash.display.Stage;
	{
		/**
		* Constructor 
		* To access and manipulate information about the boundaries of a SWF file.
		*/
		public function ConfigFile ()
		{
			// trace ("set flash to 'browser'-mode");
			_root._quality = "BEST";
			Stage.scaleMode = "noScale";
			Stage.showDefaultContextMenu = false;
			stage.align = "TL";
		}
		/**
		* static function config.... same as above
		*
		* @usage   nl.matthijskamstra.config.ConfigFile.config ();
		*/
		static public function config () : void
		{
			var temp = new nl.matthijskamstra.config.ConfigFile ();
		}
	}
	
}

this will not work without errors but will help you convert your AS2 code to AS3

package nl.matthijskamstra.config {

	import flash.display.MovieClip;	
	import flash.display.Stage;
	import flash.display.StageQuality;

	public class ConfigFile extends MovieClip {
		/**
		* Constructor 
		* To access and manipulate information about the boundaries of a SWF file.
		*/
		public function ConfigFile () {
			trace ('ConfigFile ')
			stage.quality = StageQuality.BEST;
			stage.scaleMode = "noScale";
			stage.showDefaultContextMenu = false;
			stage.align = "TL";
		}
		/**
		* static function config.... same as above
		*
		* @usage   nl.matthijskamstra.config.ConfigFile.config ();
		*/
		static public function config () : void
		{
			var temp = new nl.matthijskamstra.config.ConfigFile ();
		}		
	}

	
}

The config class that works!
package nl.matthijskamstra.config {
	
	import flash.display.MovieClip;	
	import flash.display.StageQuality;

	public class ConfigFile extends MovieClip {
		
		// Constants:
		public static var CLASS_REF = nl.matthijskamstra.config.ConfigFile;
		public static var CLASS_NAME : String = "ConfigFile";
		public static var LINKAGE_ID : String = "nl.matthijskamstra.config.ConfigFile";
		
		/**
		* Constructor
		* 
		* @usage   	import nl.matthijskamstra.config.ConfigFile; // import
		*			var __ConfigFile__ : ConfigFile = new ConfigFile ( this );
		* @param	$target_mc		a reference to a movie clip or object
		*/
		public function ConfigFile( $target_mc:MovieClip = null ) {
			// trace ( '+ ' + LINKAGE_ID + ' class instantiated');
			$target_mc.stage.quality = StageQuality.BEST;
			$target_mc.stage.scaleMode = "noScale";
			$target_mc.stage.showDefaultContextMenu = false;
			$target_mc.stage.align = "TL";
		}
		
		/**
		* static function config.... same as above
		*
		* @usage  	nl.matthijskamstra.config.ConfigFile.config(this);
		* 			ConfigFile.config (this);
		* @param	$target_mc		a reference to a movie clip or object	
		*/
		static public function config ($target_mc:MovieClip ) : void {
			var __config = new nl.matthijskamstra.config.ConfigFile ($target_mc);
		}
		
	} // end class
	
} // end package

I’m sorry for adding to the confusion which happens when you learn ActionScript 3!
The Stage class is a difficult change from AS2 to AS3, when I have some time I will explain.

Categories
AS3 Flash

AS3 – take one step at a time: step 1

I finally started programming with ActionScript 3 (AS3); I know, I not a early adopter… 😉

And the first steps in AS3 are as uncomfortable as the first time I started OOP programming … or when I started moved from AS1 to AS2…

Since I started working for NOISE 5 months ago and moved to Amsterdam, I haven’t had time to do learn AS3.
That luckily has changed 🙂 and I started learning the basics.

And the first obstacle I ran into was something very simple: I always use a basic document (FLA) with default library items, some layers I always use and some ActionScript code to align the stage:

_root._quality = "BEST";
Stage.scaleMode = "noScale";
Stage.showMenu = false;
Stage.align = "TL";
stop ();

I have this also in a class (AS2), so I thought it would be useful to rewrite this class in AS3.
and I wanted to use this in my new as3 files too… (remember that this is the first thing a tried)

First you need to create a document class:

Document Class
And in my case my document class was: ‘Main’


package  {

	public class Main {
		
		public function Main() {
			trace ('Main')			
		}
		
	}
	
}

(package generated by FlashDevelop)

Code didn’t pass; I got a Compiler Error:
5000: The class 'Main' must subclass 'flash.display.MovieClip' since it is linked to a library symbol of that type.


package  {

	public class Main extends MovieClip {
		
		public function Main() {
			trace ('Main')			
		}
		
	}
	
}

I got some new errors:

  1. 1017: The definition of base class MovieClip was not found.
  2. 5000: The class ‘Main’ must subclass ‘flash.display.MovieClip’ since it is linked to a library symbol of that type.

So I added import flash.display.MovieClip;


package  {

	import flash.display.MovieClip;
	
	public class Main extends MovieClip {
		
		public function Main() {
			trace ('Main')
		}
		
	}
	
}

Ahhh and now we can get the stage to work with my ‘old code’, let’s paste it into the new document:


package  {

	import flash.display.MovieClip;
	
	public class Main extends MovieClip {
		
		public function Main() {
			trace ('Main')
			_root._quality = "BEST";
			Stage.scaleMode = "noScale";
			Stage.showMenu = false;
			Stage.align = "TL";
			
		}
		
	}
	
}

Auw: both _root and Stage doesn’t excited no more: I got an migration error


package  {

	import flash.display.MovieClip;	
	import flash.display.Stage;
	import flash.display.StageQuality;
	
	public class Main extends MovieClip {
		
		public function Main() {
			trace ('Main')
			stage.quality = StageQuality.BEST;
			stage.scaleMode = "noScale";
			stage.showDefaultContextMenu = false;
			stage.align = "TL";
		}
		
	}
	
}

And at last it works…
The only thing now to do, is to put it in the correct package.